File this one under not-directly-applicable-but-may-come-in-handy-someday.
Jewelry artist Danielle Maveal has a great how-to up explaining high quality, handmade, glass etching up on etsy.com. It is definitely worth a look. I can think of about a dozen graphic design applications including innovative output of traditional illustration, shooting photos through an etched glass held at various angles, hand altered opacity grids that can be shot and scanned, pattern making… pick one and do it. (Be sure to post your experiments here as well as at the etsy site!)
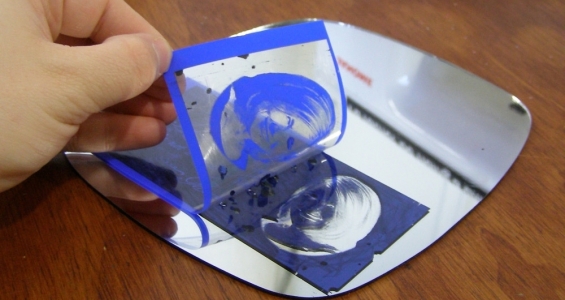
Have you ever thought about trying glass etching? If so, I’ve got a project for you! I’ve taken cream glass etching to a new level by using PNP Blue Transfer Paper as a resist! PNP Blue Transfer Paper was originally used to etch circuit boards and has recently been adapted to etch jewelry. I tested this transfer out on glass and it works like a charm! Use this photo-transferring method to create classy custom gifts. In the project below, I etched a photo and quote by Martha Stewart for Time Out New York magazine. (See it here!)
Supplies
- Flat glass or mirror to etch upon
- PNP Blue Transfer Paper (available at ThompsonEnamel.com)
- Old Iron (I like to use a heavy iron that doesn’t have an automatic shut-off)
- Contact Paper
- Amour Etching Cream (DickBlick.com)
- Foam Brush
- Rubber Gloves
- Nail Polish
- Acetone (or nail polish remover)
Step 1
Scan or create your high contrast design using photo-editing software. Print out your design in high contrast black and white onto the PNP blue paper. (See the directions included.) You need to use a laser printer or take your design to a copy center and get it photocopied onto the PNP blue paper. (Remember to invert and flip your image!)
Step 2
Make sure your flat piece of glass or mirror is clean and free of dust. With your iron set to cotton, start by tacking down a small corner of your design with the tip of the iron. Then glide the iron over the entire design smoothing out any bubbles. Lay the iron on the glass for 5 minutes. Lift the iron and apply pressure to the entire design until the transfer is almost black. Remove the iron. After allowing the glass to cool, peel off the PNP blue paper.
Step 3
Protect the rest of your piece with contact paper. Patch up any areas that the PNP blue may not have stuck to with nail polish (or small pieces of tape).
Step 4
Put on your rubber gloves (and any other safety gear you feel necessary). See how I’m not wearing gloves in the above photo? That is bad, bad, bad.
Apply a thick layer of the Armour Etch cream with a foam brush. Let it sit for 5 minutes, then rinse.
Remove your contact paper. If any of the toner from the PNP blue paper is left on your piece, remove that with a paper towel soaked in acetone (or nail polish remover). Clean with glass cleaner and you’re done!
Tada! Here’s a photo of the finished piece, graced with Martha’s visage and her quote: “I catnap now and then, but I think while I nap, so it’s not a waste of time.” Cute!
If you liked etching your designs and illustrations into glass, you may also like making this wallet, crafting your own facial hair, creating these prize-worthy ribbons, or one of these other bits of craftiness! Love, Ofazomi


